Create a tag list in Power Apps with Concat()
and it will look exactly like the list a few pixels beneath
table of contents
While building this website, I realized that I had become quite proficient in writing HTML and CSS, due to my frequent use of Power Apps and Power Automate. So I thought I'd start sharing some of my tricks and tips in these blog posts.
When should you use a taglist?
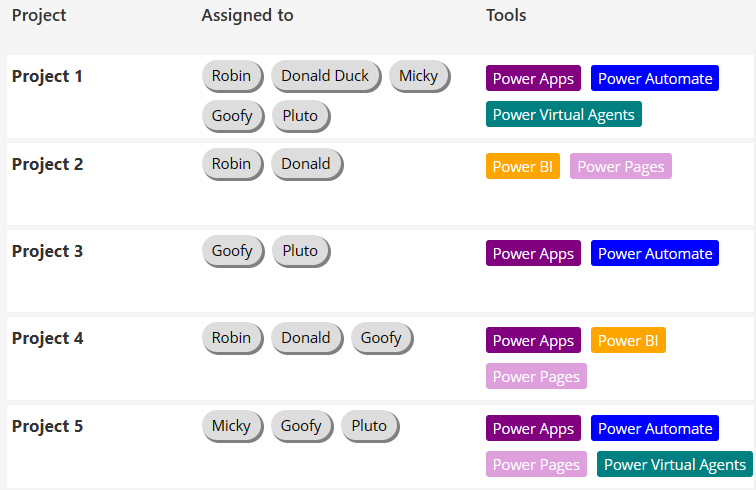
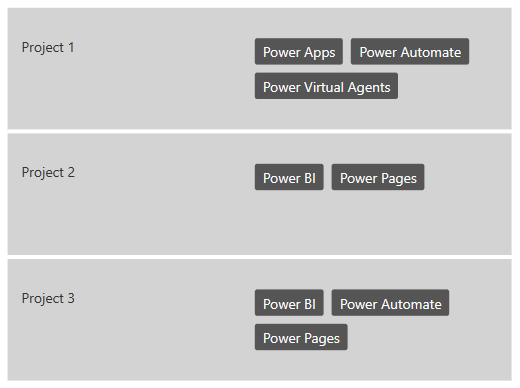
All the time! Tag lists work pretty well when you are already in a list like a Power Apps gallery. But you can also make them work like the categories in my blog posts. And they solve an important problem every novice Power Apper has encountered: how can I display a table in a flat text format? In the picture, I show two different examples of responsive tag lists inside a gallery.
However, there is one important limitation to be aware of. With the method I'll show you, it is not possible to give different OnSelect() properties to each individual tag in the list.
SharePoint multiselect columns
The table-to-text problem materialized pretty early in my Power Apps career, because SharePoint makes it sooo easy to create tables and even more tables inside of tables. When you use choice, people or lookup columns, SharePoint creates more or less complex records in each field. You'll notice pretty fast, that you have to type ThisItem.Field.Value instead of just ThisItem.Field to display something from a choice column.
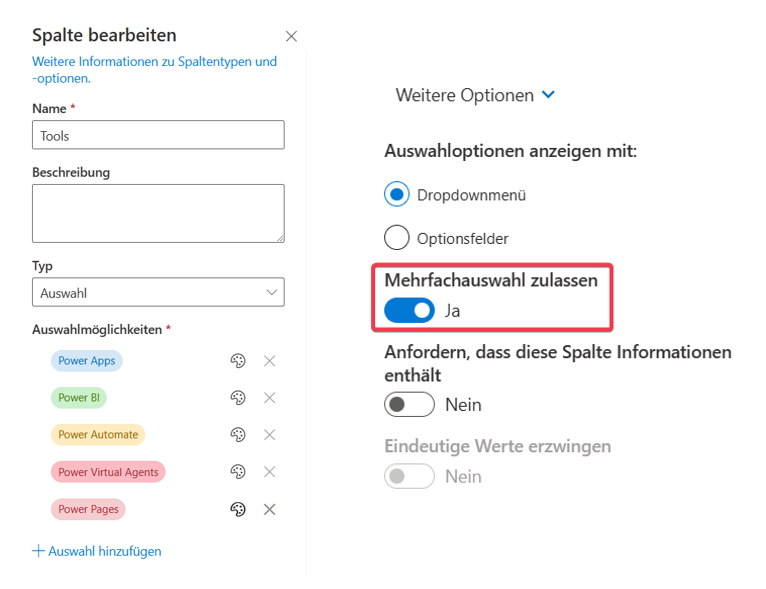
When you allow multiselect in these column types each field will be the home of a whole table. Even if there is only one record in there the type is still a table. So choose wisely if you really want to enable multiselect, because from there on everything will get a little more complex. Se let's dive right into it. Create a SharePoint table called 'Projects' and inside of it a choice column with the name of 'Tools' and enter the Power Platform products. Make sure to enable multiselect and create some dummy data.
The power of Concat()
So let's see how the Concat() function will help us getting out of this mess. Text functions sound boring at first glance, but are indispensable when using html-text fields or create your own svg images in Power Apps.
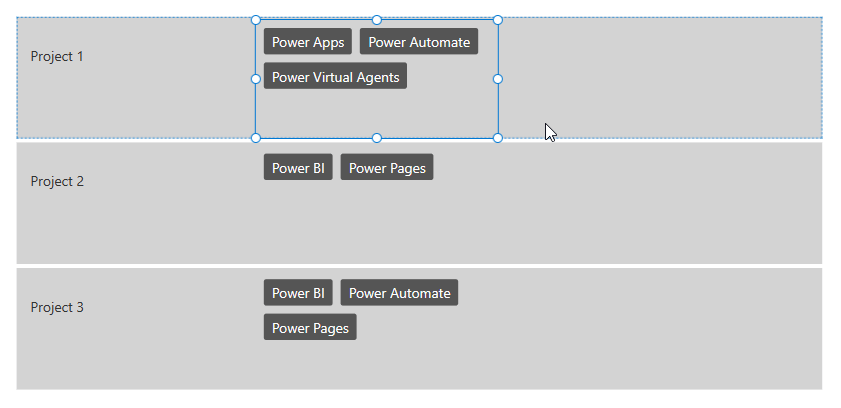
We'll create a blank vertical gallery and set the Items property to our 'Projects' list. We create a normal label fo the title (just to have some structure) and an html text for our tags. I additionally set the TemplateFill to something like 'LightGray'.
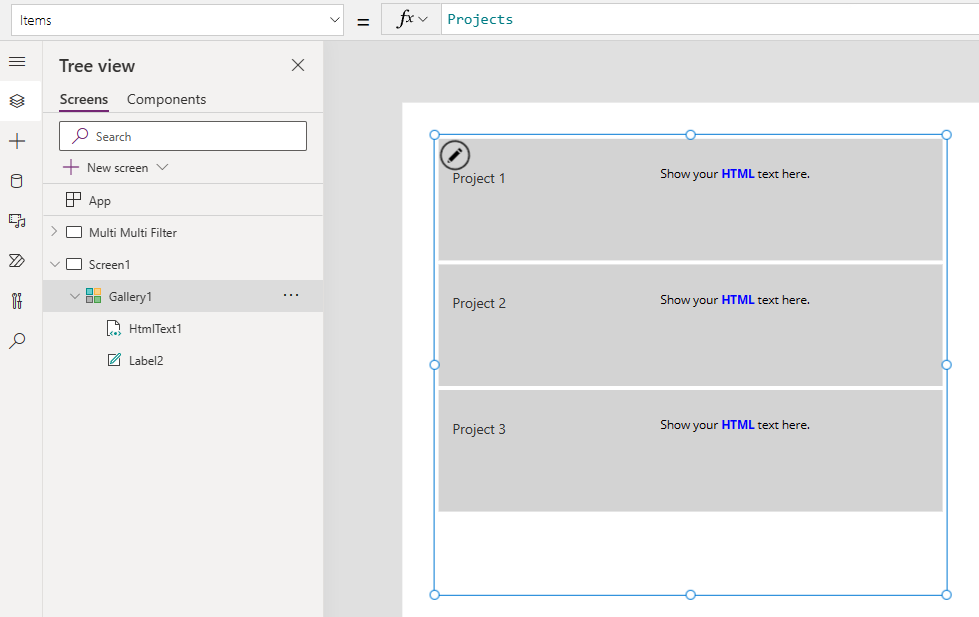
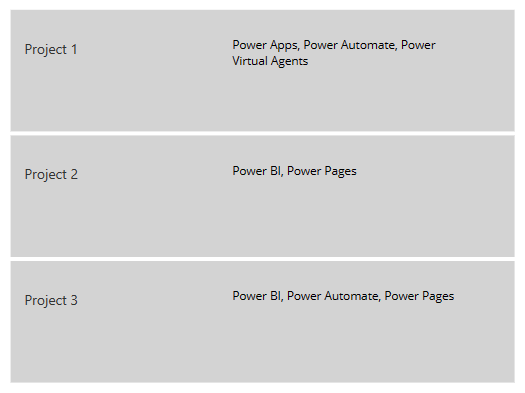
Now set the HtmlText property to Concat(ThisItem.Tools, Value, ', '). This will give us a comma separated list of the tools per project. We have solved our first problem - getting the tabular data into a text (this would of course also work with a normal label).
Going forward, it's important to understand that we can put more than one value into the expression and can get creative at the separator part. Let's put some static text into it and write 'tool: ' in front of each tool. We can use <br> to add linebreaks inside of an HTML text (use Char(10) in a normal label). We could also call multiple values from our record if we wanted to.

CSS styling in Power Apps html-texts
First we need to understand, that there is only one possibility to use CSS in Power Apps html-texts: Inline CSS!
Inline CSS refers to the use of CSS directly within an HTML element, as opposed to using a separate style sheet. Inline CSS allows you to apply a unique style to a single HTML element, such as a paragraph, link, or image. It is used to override the styles of other CSS classes, or to add unique styling to a single element. Inline styles are added directly to the HTML element using the "style" attribute. The style attribute contains a series of CSS properties and values, which are applied directly to the element.
Let's try it out and see how we can use inline CSS to style our tags. Copy&Paste this code to the HtmlText-property.
 Concat(ThisItem.Tools,
    "<div style='
        float:left;
        border-radius: 3px;
        background: #555;
        color: white;
        margin: 5px;
        padding: 5px 10px;
        '>"
    &Value
    &"</div>"
)
Let's take a quick look, which CSS-properties we used:
- float: left -> this is the key to displaying them next to each other
- border radius: 3px -> slightly rounded corners
- background: #555 -> a dark gray as the background color
- color: white -> font-color to white
- margin: 5px -> 5 pixels around each tag (so 10 between 2 tags)
- padding: 5px 10px -> gap inside the tag, first value ist bottom/top, second value is left/right
You should definitely play around a little bit with the styling and explore the possibilities.
We should take a moment to appreciate that this is responsive right from the get-go! Make sure to use set auto-height to true, when using this in flexible-height galleries.
Conditional formatting
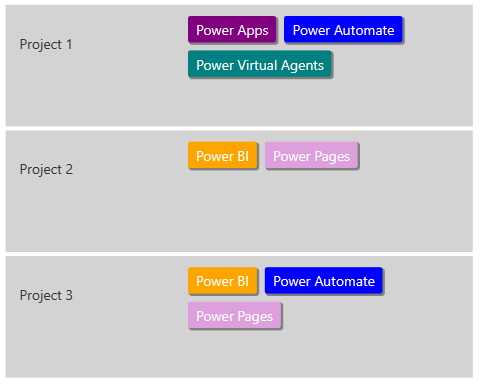
Let's add some more code for conditional formatting of the background. We can use Switch() or If() statements inside the Concat() function.
 Concat(
    ThisItem.Tools,
    "<div style='
        float:left;
        border-radius: 3px;
        background:
            "&Switch(
                Value,
                "Power Apps", "Purple",
                "Power Automate", "Blue",
                "Power BI", "Orange",
                "Power Virtual Agents", "Teal",
                "Power Pages", "#DDA0DD"
                )&";
        color: white;
        margin: 5px;
        padding: 5px 10px;
        box-shadow: 2px 2px 0px 1px gray;
        '>"
    &Value
    &"</div>"
)
We also added a box-shadow, because everyone loves box-shadows!
Now start getting creative with Concat() in your Power Apps!
You can even create far more complex html-objects with nested div or image elements. You could for example try to recreate a list with people and their profile pictures from a multi-select people column in SharePoint.

When a low-coder chooses a tech stack